
There are a few key elements that we learned about while choosing a charge controller for solar. We are also considering potential future upgrades for our current charge controller as we learned our choice of using gel batteries was not a good option; You can read about that on the Choosing A Solar System Battery article.
The main job of the charge controller is to be the “traffic cop for the electrons” as well as the “spark resizer”. It determines when to allow electricity to flow into the batteries or when to stop the flow. It will also convert the highly variable voltage coming out of the solar array into the proper voltage to charge the battery, or as I like to say “resize the sparks”.d
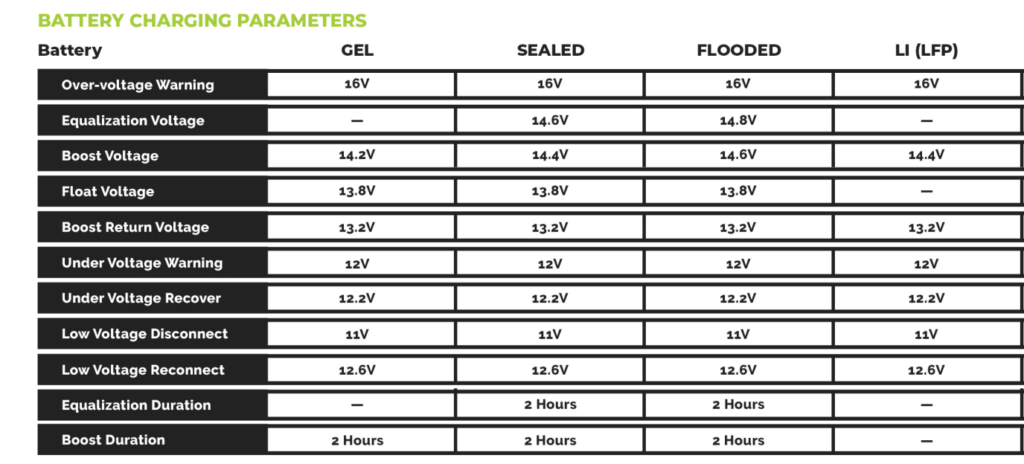
Resizing sparks is a key element and somewhat complex, which is why having a high quality controller is critical. Different types of batteries require different voltages “spark sizes” to fill them up when they are empty, another voltage when full, and yet another to “keep them full over time”. The charge controller does all of that.
Let’s dive into the basics.
Choose An MPPT Charge Controller
There are basically two types of charge controllers, Pulse Width Modulation (PWM) and Maximum Power Point Tracking (MPPT). You will typically find PWM controller less costly , but they are far less capable than MPPT charge controllers when it comes to getting the most electrons out of the solar panels and into the batteries.
MPPT will automatically limit the charge coming in from the solar array to ensure it doesn’t blow itself up. The primary concern is just making sure the voltage coming in does not exceed the rated limit. If the amperage gets too high, on a perfect sunny day with an oversized solar array, the MPPT controller will simply toss out the extra electrons like farts in the wind. With a PWM controller you’ll likely have less luck and may need new equipment if you are not careful. MPPT controllers are far more adept at handling widely varying voltages like that coming in from a solar array.
Sizing The MPPT Charge Controller
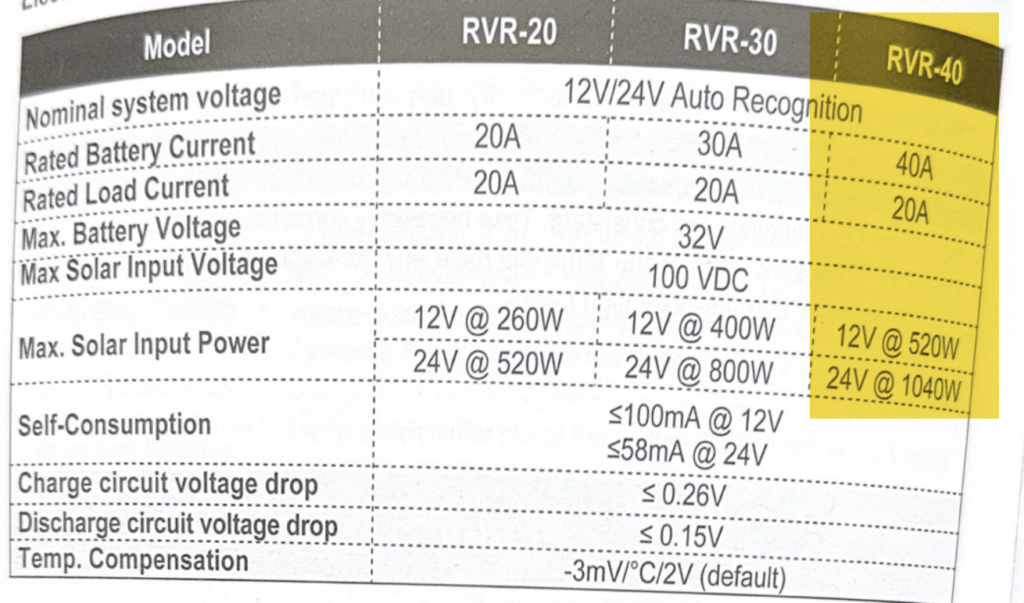
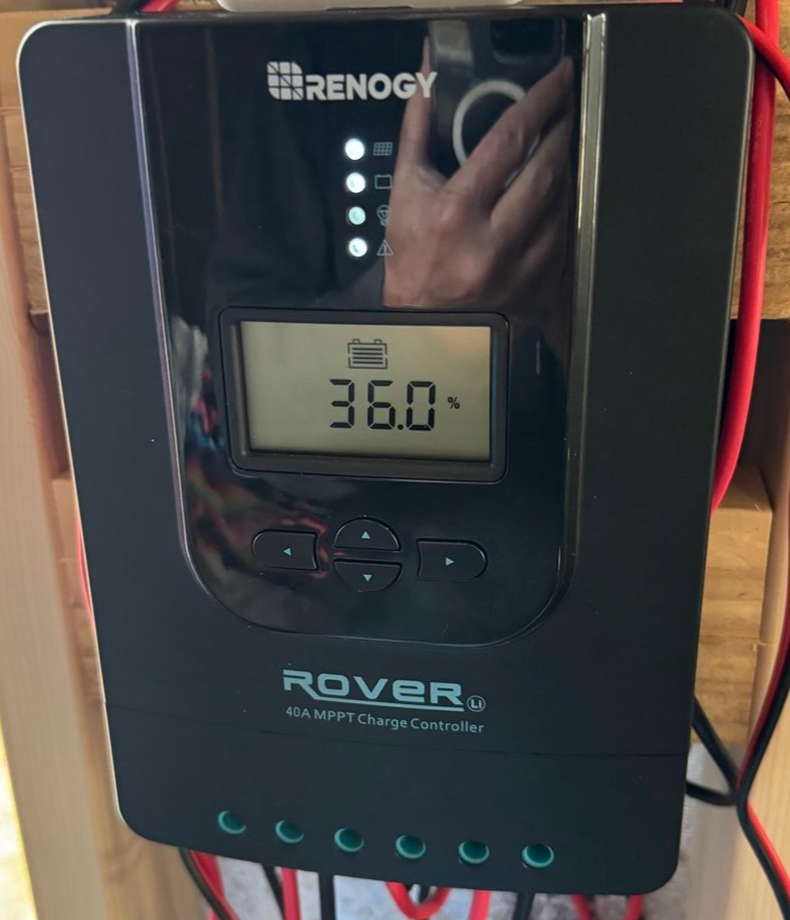
The main sizing guide on charge controllers lists the amps the controller can handle. In our case we chose the Renogy Rover RVR40 as our second charge controller. The charge controller is a “40 amp” controller, which tells us the rating for the battery current. That means it will convert the varying volts and amps from the solar panels into the right charging voltage for the battery bank, pushing out at MOST 40 amps to the batteries.
The “right” voltage depends on the type of battery, so configuring the charge controller to match the battery bank is important.
However there are a few other things to consider when picking the controller.
Sizing The Solar Input For The Charge Controller.
Deep in the charge controller manual it will provide a key piece of information if you are wiring together multiple solar panels in the solar array, which is usually the case. You will also find that wiring panels in series boost the voltage, and higher voltage means the system is more efficient — especially over longer distances; This is why long distance electrical transmission is always high voltage — as in thousands of volts (a local solar array doesn’t need to be nearly that high voltage).
In general. you usually want to string together at least a couple of panels in series to push the voltage up. 24 volts is more efficient than 12 volts. 36 volts is better. Remember, our charge controller will “resize the sparks” and drop the voltage down to what is needed to fill up our 12 volt batteries — in reality needed around 14 volts to push the electrons into a battery that has 12 volt electrons trying to get out.
A key element here — KNOW THE MAXIMUM SOLAR INPUT VOLTAGE OF THE CHARGE CONTROLLER AND THE OPTIMUM OUTPUT OF THE SOLAR PANEL(s).
In our controller it tells us that is is ok up to 100 VDC (volts DC).
This is based on the OPTIMAL VOLTAGE of the solar panel. As you can see below, our panels put out 20.4 volts optimal power. That means on a perfectly sunny day with the panel at just the right angle it can push out 20.4 volts at 4.91 amps. Typically it is going to do far less, around 10 volts on average. However if we don’t want to turn our charge controller into flaming heap of plastic then we need to plan for the best (worst?) case scenario of 20.4 volts per panel.

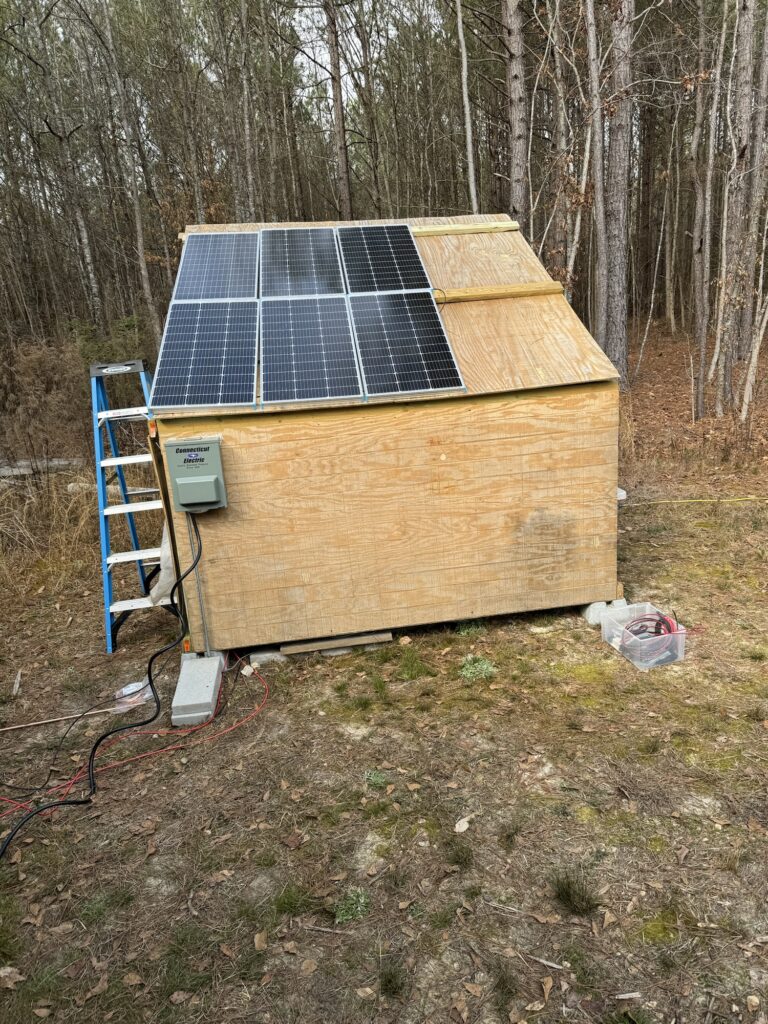
Because we want our system to be as efficient as possible, we have wired our panels in series. We connected 3 panels in each string, which means in series our voltage is 20.4v + 20.4v + 20.4v optimal output at 4.91 amps (series wiring increases volts and leaves amps the same). Our total output is 61.2 volts at most. Under our 100VDC the charge controller can handle.
Other Charge Controller Solar Connection Considerations
In addition to watching the maximum input voltage and comparing it to your solar panel inputs, you need to also pay attention to the maximum watts the charge controller can handle coming in. A good controller will limit the total amperage, but it is good not to push it outside the rated limits.
Our RVR40 is rated for up to 12v@520w and 24v@1040w. This is the maximum wattage the controller can handle in each configuration. Here the voltage refers to the “system voltage”. System voltage is based on the nominal voltage of the battery bank. In our configuration that means our panels should be close to 520 watts to feed the 12 volt battery bank.
Our Solar System Charge Controller Numbers
- Solar array output: 61.2 volts and 9.82 amps : about 600W total
- Each series is (3) 100W panels at 20.4 volts , 4.91 amps optimal each
- Each series connected in parallel
This is the “best case sunny day” scenario. In reality we rarely see over 60% output from the array even in full sun. We would LOVE to see an 80% output from the panels, but that is going to be very rare and thus we are coming in at maximum 480 watts from our panels to the charge controller.
- Our “solar system” (battery nominal) rating is 12v
- Charge controller can push 40A max to the battery
- The maximum 61.2 volts at 9.82 amps (600W max input) will be stepped down to just over 12v
- At max input that 600w on 12v would push 50A, over our 40A limit but in reality this will never happen
- If this DID happen the charge controller would just throw away the extra electrons
Other Things About Choosing A Charge Controller
- The amp rating (40a in our example) of the charge controller is the maximum safe amperage that can be pushed to the battery bank.
- Nominal System Voltage (12/24v on the RVR40) is the BATTERY voltage rating, this one supports 12 volt or 24 volt batteries (DO NOT mix-and-match).
- The closer the solar array output voltage is to the voltage needed to charge the batteries (14v for a12v battery) the less work the charge controller has to do.
- MPPT charge controllers are very good at converting higher voltages down to the 14v needed to charge the battery, extra voltage is converted to higher amps to fill the batteries faster.
- Do not exceed the max solar input voltage (100V in our example) when wiring panels in series.
- You can use multiple charge controllers to charge a single battery stack.
- Use the battery temp sensor to avoid overheating.
In Summary
Our current charge controller is the right size for our 12v solar system using a battery bank consisting of 400ah of 12v gel batteries. The solar input is right inline with the top limits of this controller, pushing out 600w (optimal/maximum) but in reality closer to 300W via 30-60v real world output at 2-8 amps on most days. We will likely update to either add another charge controller (also MPPT) to another set of panels and attach it to the battery bank or go with a larger more capable controller.
We will also likely add the blue tooth module and “one M1” monitoring device to our setup. This will allow the charge controller to talk to the monitoring device via bluetooth. The monitoring device will collect and store real world data for up to 30 days at a time and the wifi connection will eventually be added to our Starlink setup so we can gather and report our real world findings throughout this journey.
Charge Controller Research
Our 2024 list of MPPT controllers.
The ratings are the maximum outputs/inputs.
Battery output includes max amperage, battery voltages supported, type of battery (lead include sealed lead acid, gel, and AGM) and connector type.
Solar input includes the max input voltage and the max wattage based on battery voltage in use, and connector type.
The load is the max load, the charge controllers power consumption, and the connector type.
The accessories with + are paid add ons.
| Product | Battery Output | Solar Input | Load | Accessories |
|---|---|---|---|---|
| 40A Charge Controllers | ||||
| Renogy Rover RVR 40 | 40A 12/24v Lead/Lithium 8awg screw terminal | 100v 520W 12v 1040w 24v 8awg screw terminal | 20A 1.2w 8awg screw terminal | Battery Temp Sensor +Bluetooth module + Monitor — Temp sensor port |
| EP Solar 40A Tracer 4215 | 40A 12/24v Lead/Lithium | 150v 600w 12v 1200w 24v | 20A 1.2w 4awg screw terminal | Battery Temp Sensor Remote meter RJ45 meter cable RJ45 usb adapter — Temp sensor port |
| Rich Solar MPPT40 | 40A 12/24v Lead/Lithium 8awg screw terminal | 100v 550w 12v 1100w 24v 8awg screw terminal | 20A 1.2w 8awg screw terminal | |
| 80A Charge Controllers | ||||
| Ampinvt AP-80C | 80A 12/24/36/48v Lead/Lithium Screw terminal | 150v 1140w 12v 2260w 24v 3420w 36v 4540w 48v Screw terminal | Screw terminal | Battery Temp Sensor — RS485 port Temp sensor port |
| 100A Charge Controllers | ||||
| Renogy Rover RVR 100 | 100A 12/24/36/48v Lead/Lithium 4awg screw terminal | 150v 1300w 12v 2600w 24v 3900w 36V 5200w 48v 4awg screw terminal | 2.7 – 2.9w 4awg screw terminal | Battery Temp Sensor Parallel Cable + Bluetooth module + Data Monitor — Temp sensor port |
| Victron SmartSolar MPPT 250 100 | 100A 12/24/48v 2awg screw terminal | 250v 1450w 12v 2900w 24v 4350w 36v 5800w 48v 2 awg screw terminal | 0.04w no load connector | Bluetooth (built in) Parallel via BT/CAN + Data Monitor — RJ45 CAN bus ports |