
At the Rally Creek property we have been using Starlink powered 100% by off grid solar. Turns out the amount of power needed to keep Starlink running 24×7 is much higher than we anticipated. Unlike the minisplit used to keep the Blue Skies cabin cool or the cooler to keep food and drinks cold, the Starlink runs 24×7 and that constant draw adds up quickly. The big question is what does it take to run a sun powered Starlink setup?
How Much Energy Does Starlink Use?
Our second generation Starlink which includes a motorized dish that self-aligns, the system is needs 50 watts of power. That does vary slightly based on streaming rates, but overall is is very close to 50 watts. Daily that means the Starlink is consuming 1.5 kWh of energy.
Here is the Energy calculation:
Starlink Power Rating: 50 W
Energy consumed (hourly): 50 wH = 50 W * 1 H
Energy consumed (daily): 1.2 kWh = 1,200 wH = 50 wH * 24

Inverter inefficiency: 25%
Daily energy consumed from batteries: 1.5 kWh = 1.2 kWh * 1.25
How Much Energy Does An 800 Watt Solar Array Produce?
The current solar shed installation is using (8) 100 watt Renogy solar panels wired in two strings of 4 (4 in series or 4S). The strings are connected in parallel, with two of them (2P) making our solar array a 4S2P configuration.
The array is mounted to a fixed surface that is at approximately a 22-degree angle facing due south. The panels experience shade for the first hour or so after sunrise and again about 3.5 hours before sunset. Not optimal, but close to typical for anyone with a solar array not mounted in the middle of a wide-open multi-acre field. We have ours on the northwest corner of a plot with about 1/4 acre cleared.
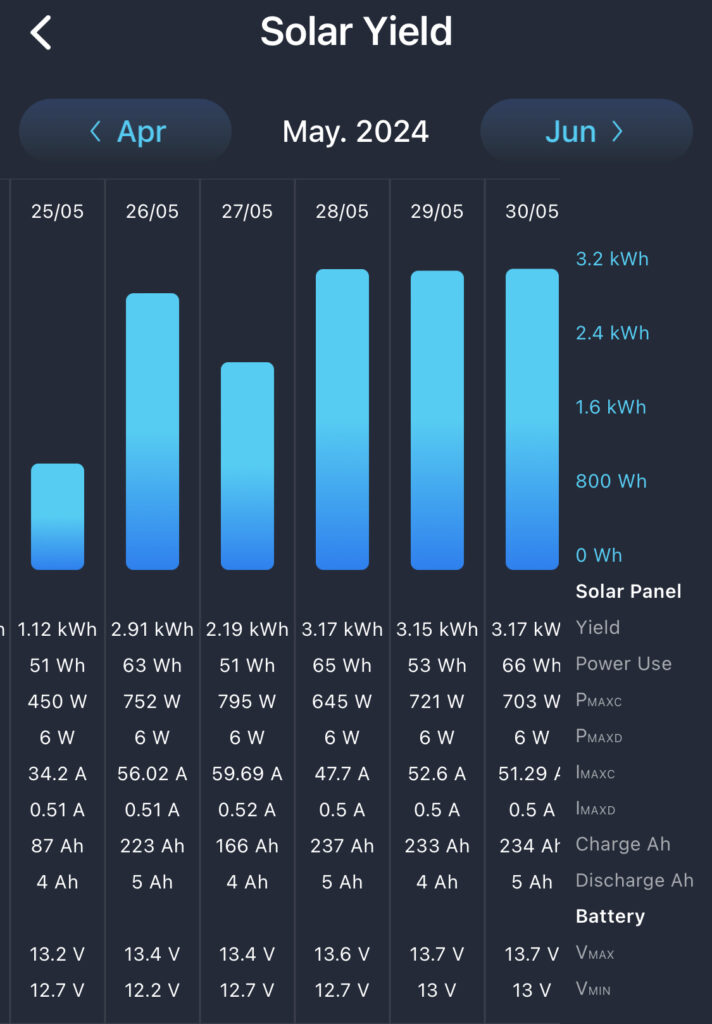
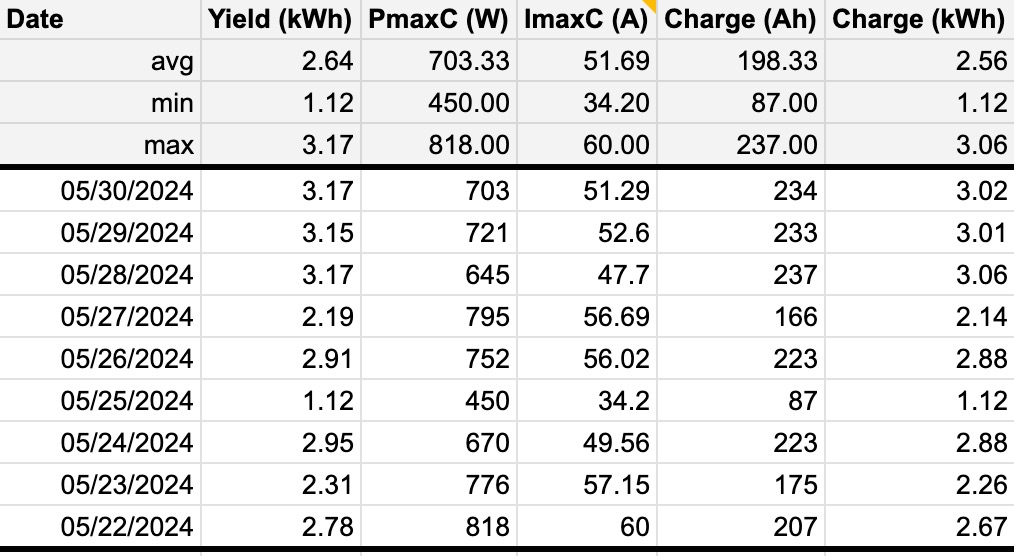
This is running through a Renogy Rover 60 charge controller, which is limited to 800W max input on our 12 volt system. Over the course of a week or so at the end of May the total energy added to the batteries averaged an unusual 2.56 kWh following 9 of 10 days being mostly sunny. We will go back and track this over a longer period of time and through more varied weather.
For now we will set our baseline at a slightly conservative estimate of daily generation at 2.25 kWh daily.
Our Sun Powered Starlink Summary
Our current configuration of 800 W of solar panels, a Renogy Rover 60 charge controller with a 800 W max power input, a big stack of 14.4kWh of LFP (LiFePO4) batteries, and a Renogy 2000W inverter can easily handle running the Starlink non-stop for a long time, even through extended periods of less-than-optimal sunshine. This is overkill as we also plan to run our mini cooler and the mini split air conditioning or heating when at the property. Let’s distill out the Starlink only parts so we can estimate the minimum system required to run a sun powered Starlink setup.
Starlink Daily Energy Requirement: 1.5 kWh = 1,500 wH
800W Solar Panel Energy Generation: 2.25 kWh = 2,250 wH
Surplus energy to store each day: 0.75 kWh = 750 wH
Remember these numbers are for summer in South Carolina. The energy generation is likely to decline significantly in the winter as well as early fall when seasonal rain and accompanying clouds are far more prevalent. As such, we are likely at very close to a reasonable minimum configuration for the solar panels and the charge controller. While you could go down to a 600W set of panels in a 3S2P configuration and produce and average of 1.6kWh daily , I would not recommend that as it leaves little power to store in a battery bank for rainy days and is likely to be underpowered for 4 months of the year.
Minimum Sun Powered Starlink Configuration
Based on the first few months of research the solar panels and charge controller look to be the right size. Our battery bank at 14.4 kWh is oversized and our inverter at 2000W of 115V and a max of 20A is also overkill.
Inverter Sizing
The smallest Renogy pure sine wave inverter is rated for 700W and would certainly do the trick ($120 vs. $270 for the 2000W version at the time of writing). Not that we are promoting Renogy as THE solution here, it just happens to be a popular consumer brand on Amazon and is where we started our journey. There are other brands that would work just as well.
Battery Sizing
As for battery storage, definitely stick to LFP (LiFePO4) batteries – they last munch longer and you get more usable energy out of them over their lifetime. The marginally higher cost is well worth the price with the only caveat being that in freezing temps you will need to pay a bit more for the heated batteries (still worth it IMO). How big a battery do you need? To get through a single night you should assume up to 16 hours of capacity for those long cold winter nights. Let’s do the math.
Energy Consumption (hourly): 50 wH
Hours Needed: 16
Total wH needed: 800wH

LiFePO4 Max DoD: 80%
Battery Capacity Needed (w/ 20% buffer): 1kWh = 1,000Wh  = 800wH / 0.8
12v Battery Capacity In Ah: 83.3 aH = 1,0000 / 12
From the above math, you would need at least an 83.3 aH battery. The closest typical LFP battery that will be at or above 83aH would be a 100Ah battery.
For most situations you likely want at least a 200Ah battery to not only account for a long winter night but a long winter night and a rainy (or snowy) winter day.
Our Recommended Minimum Sun Powered Starlink Kit
This would be our starting shopping list for a sun powered Starlink setup:
- Starlink Generation 3 (the latest current generation)
- 800W of solar panels
- A MPPT charge controller that supports 800W (or more) on a 12v system like our Renogy Rover 60
- A 200Ah LiFePO4 battery
- A 700W Pure Sine Wave Inverter
You will also want a cabinet or case that is waterproof, but not airtight (the component need to dissipate heat through air flow) and a mounting pole or raised location for the Starlink to reside. If you use a pole with the 3rd generation Starlink you will need their pole mount adapter.
For solar panels we recommend doing something like (4) 200W panels if you have shading issues like we do. An MPPT controller will more easily be able to shut down panels or strings that are shaded and thus produce more energy if you can wire them in a 2S2P configuration. At the very least it gives you a couple of options as to how to connect them together. If you have full sun, then go for a 2S or 2P configuration with a pair of 400W (or slightly lower) panels — just keep in mind the maximum your charge controller can handle when doing so.
If you have comments or suggestions on improving our recommended setup, please let us know!