We continue to extend our off grid systems, this time working on a do-it-yourself (DIY) solar generator designed by Will Prowse. Will’s videos and online documentation are a great place to start if you are looking into DIY solar projects. It is where we started and helped us on our journey to getting at least part of our life off grid in terms of electrical energy. Will’s resources are awesome, but there are some details that are glossed over that we wanted to document for our own records. We get it, once you do something for a while you forget that complete newbs (still us, mostly) need explicit details for every step of the process. Who knows, it may help some other out that are trying to build the same systems.
When we are finished we will end up with an INDOOR RATED solar generator that can be moved around on the hand truck. The battery bank can be charged via a standard AC outlet, just plug it into a standard 110 volt AC outlet with a 15 amp or higher rating. It includes that ability to safely connect and disconnect solar panels to charge the unit from the sun instead of using grid power. The inverter is rated for 5Kw of output, but we are designing this to support smaller 110V 20A loads to power things like our refrigerator and a window fan in case of a power outage at our primary residence (not off grid, yet). We will use it to power our outdoor mini fridge and outdoor lighting in non-emergency situations to ensure the battery is being “exercised” on a regular basis and not just sitting at 100% capacity in storage most of the year.
DIY Versus Off-The-Shelf Solar Generator
Why build your own solar generator when you can buy one already built? The retail options are plug-and-play and are very capable in their own right. However, like anything that is ready-to-go you pay for the convenience. For this situation it presented not only a learning opportunity, but also the ability to maintain at least some of the system ourselves. We can also upgrade various components at any time without being locked in to a specific vendor stack. Many parts are interchangeable with items from other manufacturers. Plus we just like hacking stuff. What fun is it if there is no risk of permanent disfigurement or injury?
What options are out there that are well rated?
| DIY 5K Sungold Power Hand Truck | Anker SOLIX F2000 | Jackery Solar Generator 5000+ | |
| Cost | $2797 Amazon / Home Depot + 2 hours labor | $1312 at Amazon | $3599 at Amazon |
| AC Input (max) | 7200W (120V @ 60A) | 1440W (120V @ 12A) | 1800W (120V @ 15A) |
| AC Output (max) | 5000 W | 2400 W | 7200 W |
| AC Outlets | (4) 20A 120V | (4) 15A 120V 30A RV Port (2) USB A (3) USB C | (4) 20A 120V 30A RV Port (2) USB-C |
| Battery Storage | 5120 Wh | 2048 Wh | 5040 Wh |
| Solar Input (max) | 5500 W (250V @ 22A) 120-500Vdc @ 22A | 1000 W (50V @ 20A) 11 – 32Vdc @ 10A 32 – 60Vdc @ 20A | 6000 W (400V @ 15A) 134 – 450Vdc @ 15A |
| Solar In Connector | MC4 Standard | Proprietary | Proprietary |
| Solar Panel Production (max) | 800W (4) 200W Shadowflux | 400W (2) 200W foldable | 500W (6) 85W foldable |
| Add 760 Battery for 4096Wh +$899 Add (2) PS200 Panels for 800W +$586 Total: $2,797 |
The main numbers to look at include:
- Max AC Output – how many things can it power at one time.
- A typical 22cf fridge uses 150 – 200 watts, however the startup surge (when the compressor first kicks on) is 800 watts (W) , so your solar generator needs to support that much power at a minimum.
- Battery Size – how much capacity does the battery hold?
- The number of Watt-hours (Wh) will tell you how long a device can be powered from battery.
- If a fridge consumes 200W, the DIY could run the fridge for 25 hours worth of cooling cycles (a couple days at least as the cooling cycles turn on and off), 10 hours or a day-or-so on the Anker
- AC or Solar Input – how fast can you refill the battery?
- AC input charges from “the grid” (utility power) , the higher the number the faster the battery fills.
- From empty the DIY kit will be filled in less than an hour, the Anker in a couple of hours
- Solar Input tells you how many panels you can connect, and thus how quickly the sun can refill the battery.
- On the DIY system you can add enough panels to fill the battery in an hour.
- On the Anker you can add enough panels to fill the battery in two hours.
- This is notable as the DIY has TWICE the capacity. Also if you can fill the battery in AN HOUR OR LESS that means the sun can produce as much power as you consume at any given moment. 5500W in can keep up with the 5000W out even after accounting for system losses. Not on the Anker.
- AC input charges from “the grid” (utility power) , the higher the number the faster the battery fills.
If you start to compare apples-to-apples you quickly find a prebuilt system like the Anker Solix ends up at the same $2797 price (odd coincidence) when you get up to the same 800W solar input and a lesser 4096 Wh (versus 5120 Wh of our DIY) battery bank. Yes, the Anker has some nice features like an RV port or USB outlets, but with the DIY these can be easily added. Swap out the AC Power box with any number of AC distribution boxes and you can get just about any configuration of power ports that you like – like the NEMA 14-50, plus TT30 RV port, and 110V 20A outlet we used at our Rally Creek property for our EV charging connections. The Jackery setup is a good bit more costly with less solar power generation but more AC output. It is also important to note the DIY build has much higher quality panels that perform far better in partly shaded installation locations than most panels on the market. Certainly far more than a foldable panel, though they are not as portable (though still small and light enough to move with one person).
There are definitely trade offs with either approach. Personally I prefer a DIY build that can be maintained, expanded, and customized to my specific needs.
The Minimal Setup
The first step is to put together the basic kit that can provide backup power when needed. This configuration provides a plug in battery backup that is far larger than a typical uninteruptable power supply (UPS) that you would buy at a retail outlet. It takes a bit more effort to build but you get a lot of power for the dollar.
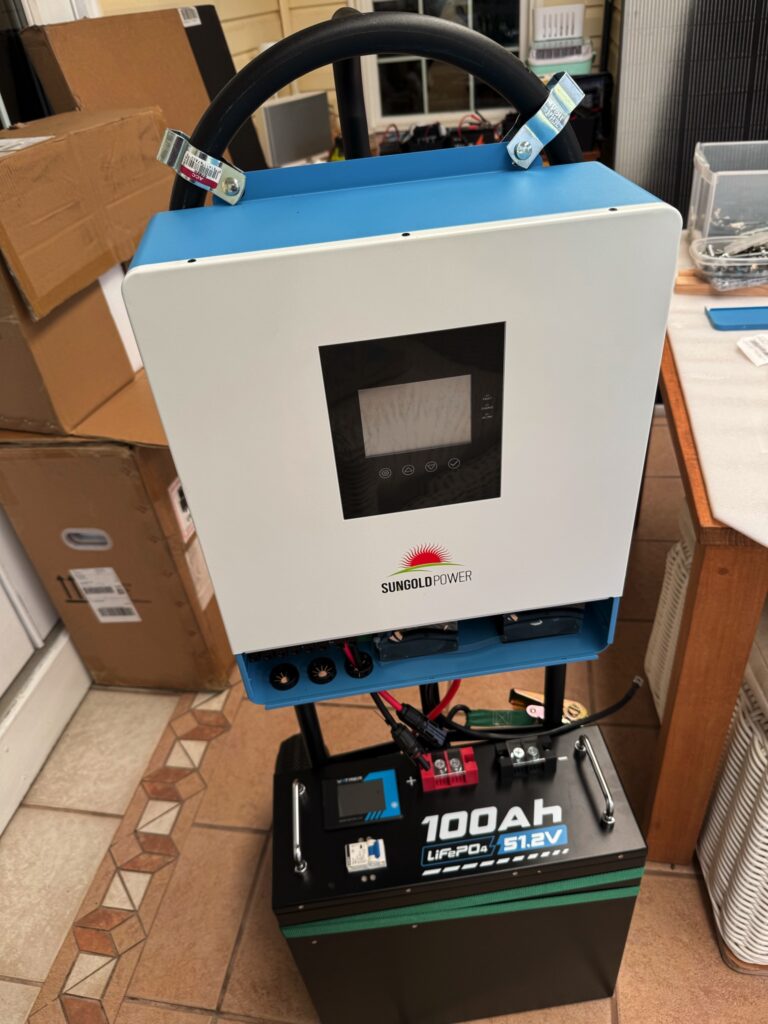
We are going to start with the battery bank, a chargeverter, and AC input plug, and an AC Output breaker box with outlets. This provides the bare minimum to be able to use this setup. At this stage it does require grid power for AC input to charge the battery. When complete you will have a 5 KW inverter with a 100 Ah of 48 Volt storage. When the battery is fully charged you could run at a full 5Kw of output for about 10 hours or so.
Battery: 51.2V x 100Ah = 51,200 VAh = 51.2 Kwh or about 50 Kwh of storage
Inverter: 5 Kw max output , so ~ 50Kwh of power storage / 5 Kw = 10 hours if run “full tilt” (we won’t be doing that).
That is a LOT of power.
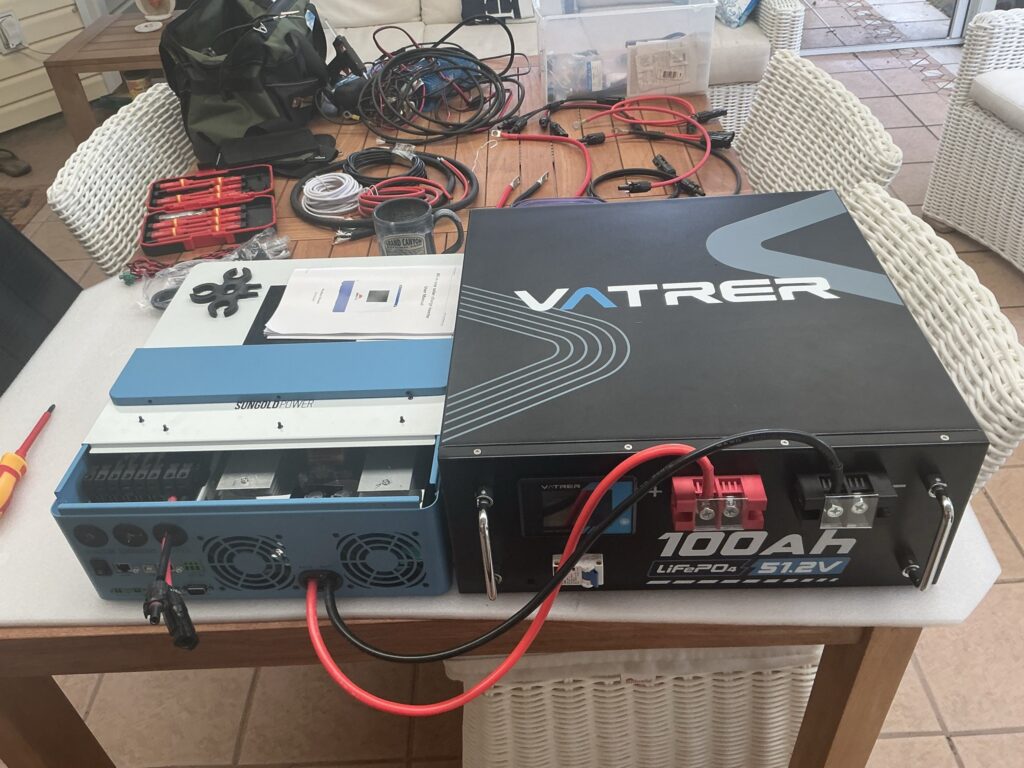
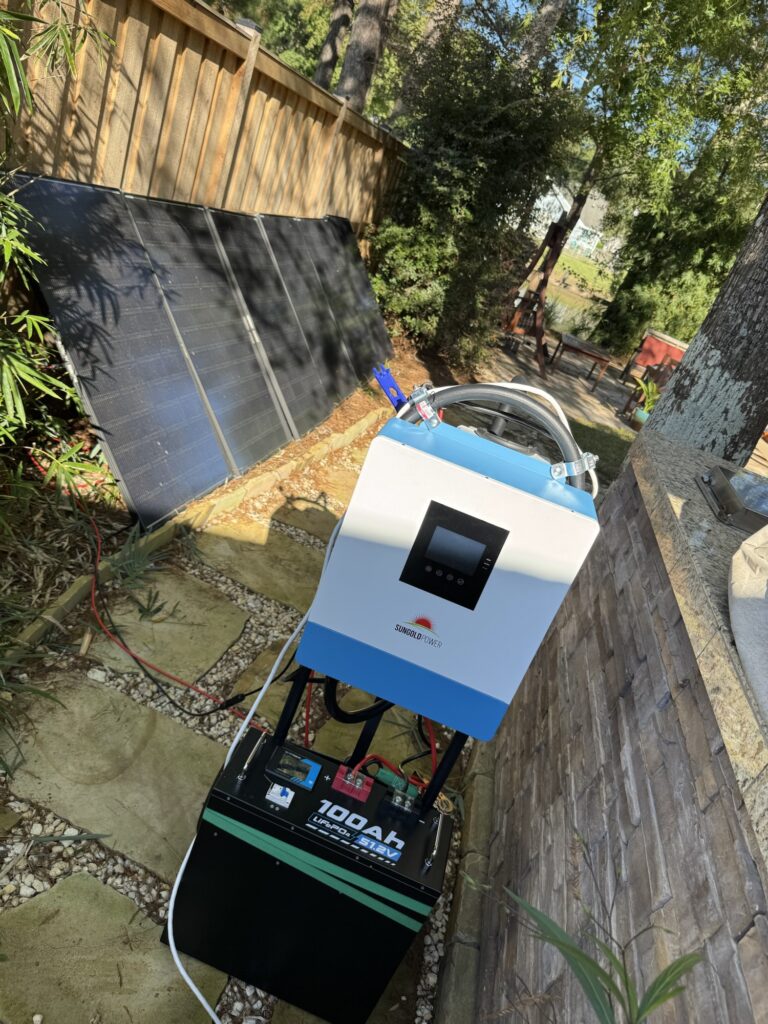
To build this setup you’ll need the battery, inverter, a 110V power patch cord to plugin the Inverter, a short 2 foot length of 3-wire 110V cable, and an AC outlet box. We chose the Vatrer 48V 100Ah battery, the Solark 5000W chargeverter, and some basic cables and outlet boxes as suggested in Will’s original article.
While you can start by setting this up indoors on a table, the battery is heavy (100+ lbs) and the chargeverter is not very light either (25+ lbs). While we started there to test things out, if you intend to do the full hand-truck build, now is the time to mount everything to the hand truck and work on our build-out there.
Minimal build cost us $1774.00 plus a couple hours or labor, mostly stripping and shaving down the oversized power cord. Second build would likely take less than an hour, especially with a 10AWG cable versus the 8AWG we used.
The Complete Build
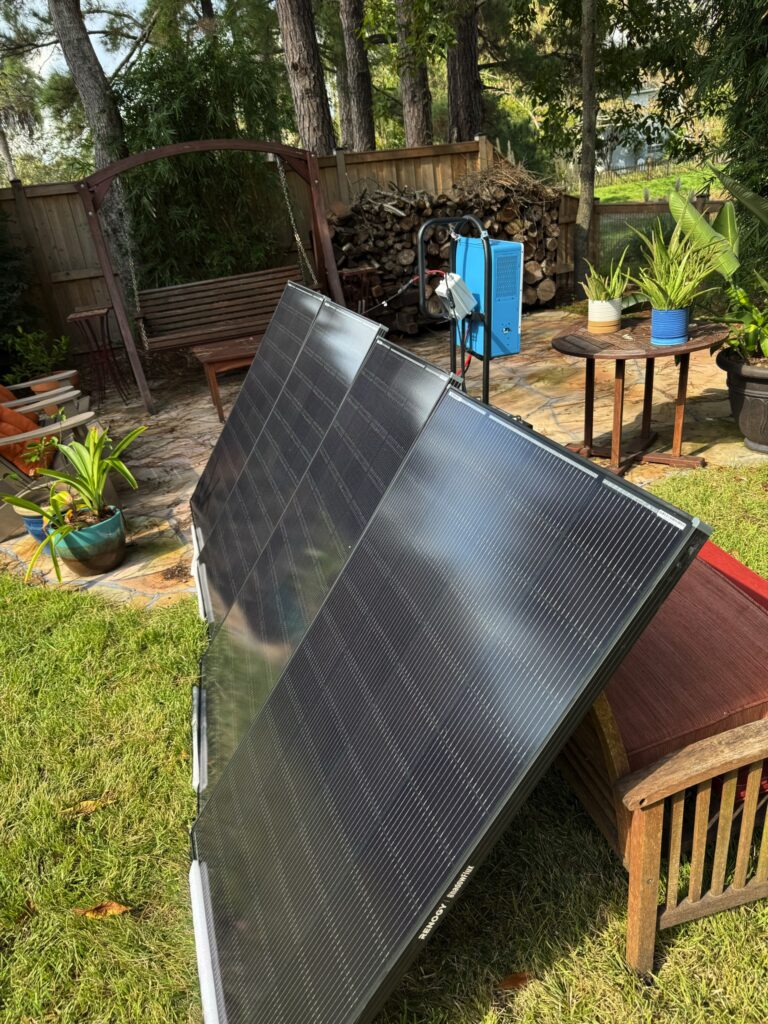
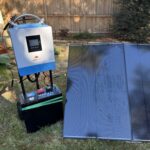
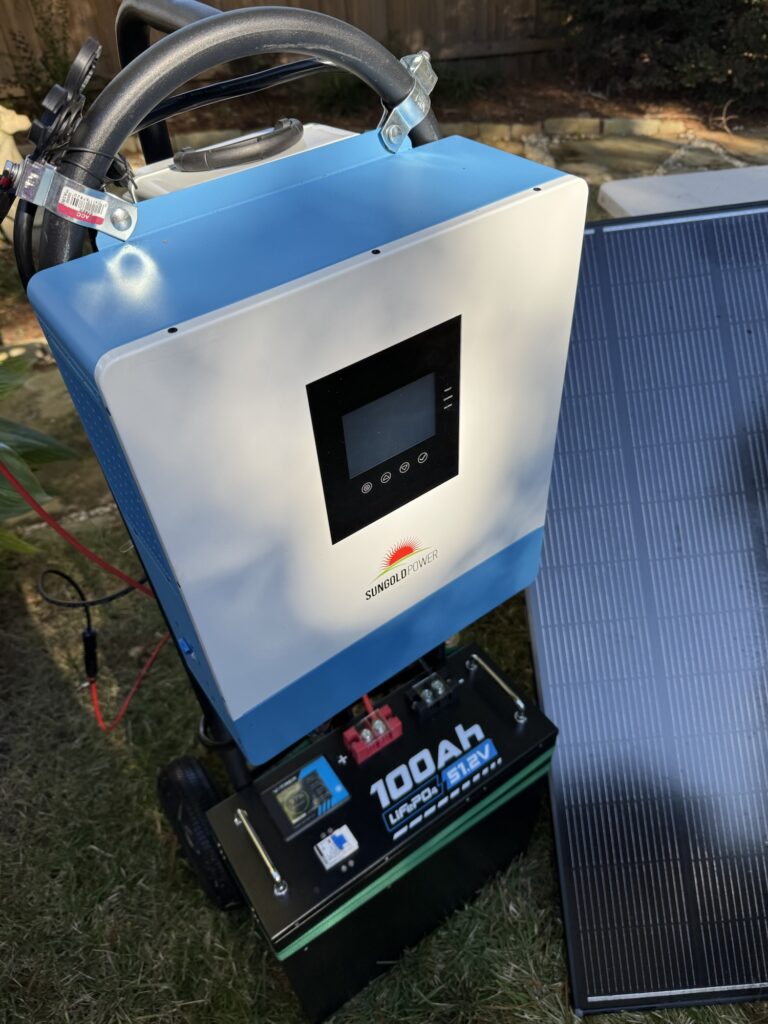
The complete build provides a mostly portable solar generator. It is fairly heavy, around 150 pounds, but easily moved around with the hand truck – less the solar panels of course. The panels are light and not too large, they can be easily moved around by most people. Note that there is not stand for the panels. I’ve propped them up against deck chairs and found a notched 2×4 at 4 foot length can serve as a temporary stand.
The completed unit stores 48 volts with 100 Ah capacity , in reality 51.2 volts but that is with some buffer built in to what is considered a standard 48 volt system. The chargeverter provides the ability to output 5 Kw continuously, though that is not usually the case for a unit like this.
The Panels
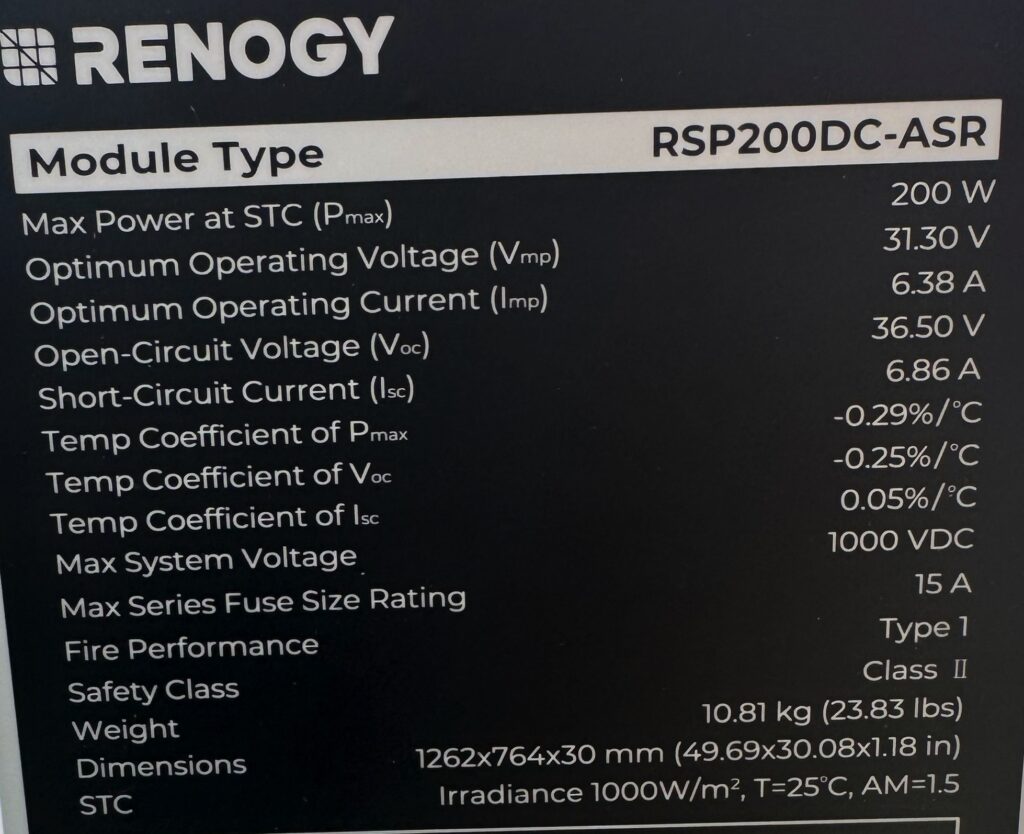
Our panels are Renogy Shadowflux 200 panels. These are designed to maintain maximum output in partially shaded environments. Solar panels use bypass diode to shut off part of a panel when it is shaded. Shaded cells on a solar panel CONSUME power as the electricity is always trying to reach equilibrium. To prevent this newer panels will shut off shaded areas. Most panels reduce build complexity and cost by only have a few bypass diodes. They tend to split the panel into 3 columns. If part of a column is shaded it cuts power to/from that column. You quickly go from 100% output on a panel to 66% then 33% then nothing. The Shadowflux design uses 28 bypass diodes, so the panel is divided into squares. Shade on the bottom right corner only turns off those cells, meaning you still get 85% or better output. This can have a notable impact on real world installations at a typical suburban home where shadows are often an issue.
Parts List
| Type | Product | Cost (Oct 2025) |
|---|---|---|
| Battery | Vartrer 48V 100Ah LiFePO4 Rack Battery | $850 at Amazon |
| Chargeverter | Sungold Power SPH5048P 5Kw Chargeverter | $799 at Amazon |
| Cable, AC In | VSEER 12AWG 6′ AC Replacement Cord | $17 at Amazon |
| Cable, AC Out | FIRMERST 8AWG 6′ Copper Power Cable | $23 at Amazon |
| AC Power Box | JINDOUZI Power Distribution Box | $85 at Amazon |
| $1774 minimum build | ||
| Making It Solar Powered | ||
| Solar Panels | (4) Renogy Shadowflux 200W Panels (minimum) $216 each | $864 at Amazon |
| Breaker, Solar Input | CNLonQCom 32A Solar Breaker | $27 at Amazon |
| Cable, 6′ Solar Extension | (2) BougeRV 6′ 10AWG Solar Extension Cable $19 each | $38 at Amazon |
| MC4 Tool | Renege Solar Panel Connector Tool We recommend upgrading to the BougeRV Crimp Tool Kit $28 at Amazon | $9 at Amazon |
| $2712 solar charged | ||
| Making It Portable | ||
| The Wheels | Milwaukee Hand Truck | $79 at Home Depot |
| Mounting Hardware | (2) #2 ACC Conduit Hanger < $2 each | $3 at Home Depot |
| Strap | 15′ Husky Ratchet Strap | $3 at Home Depot |
| Complete portable solar generator | $2797 |
Minimal Setup
- Varter 100Ah 48v (51.2v) LiFePO4 Battery
- Includes battery to inverter cable
- Sungold Power 5Kw Inverter
- 8 awg 3-Wire Outdoor / UV Rated Electrical Cable
- The FIRMERST 8AWG cable is what was used on the original build.
- This cable is about 1/4″ too thick to fit easily into the JINDOUZI input gland or the Sunpower chargeverter.
- Downsizing to a 10AWG cable would work better and provide a smaller diameter cable without much risk of overheating
- 4 Port Outdoor Outlet Box with Breaker and Monitor
- 12awg 110V Power Patch Cord
Making It Solar Powered
- 200W Renogy Shadowflux Solar Panels
- 4 panels minimum to get the chargeverter to 100v minimum DC input
- 6 panels recommended minimum for shading and to extend solar input hours with low light
- 10 panels max
- These panels have more bypass diodes which produces more power if the panel is partly shaded, a common real-world situation
- 50A MC4 Outdoor Solar Breaker w/ Case
- Safely disconnect solar power from the chargeverter
- Connect solar breaker to chargeverter
- (2) 6′ 10AWG MC4 Terminated Solar Extension Cable
- Needed to extend the short solar panel pigtails so they reach the chargeverter solar input
- Requires a basic crimp tool , we use the one on our wire stripper
- Second one is to attach the solar breaker to the chargeverter
- This one will be trimmed to 12″ or so
- MC4 Tool
- Detach solar array from breaker disconnect
Making It Portable
- Hand Truck
- Wheel the 150 pounds of equipment around
- 2” ACC Conduit Hanger
- Attach chargeverter to hand truck, no drilling required
- Ratchet Strap
- Attach battery to hand truck
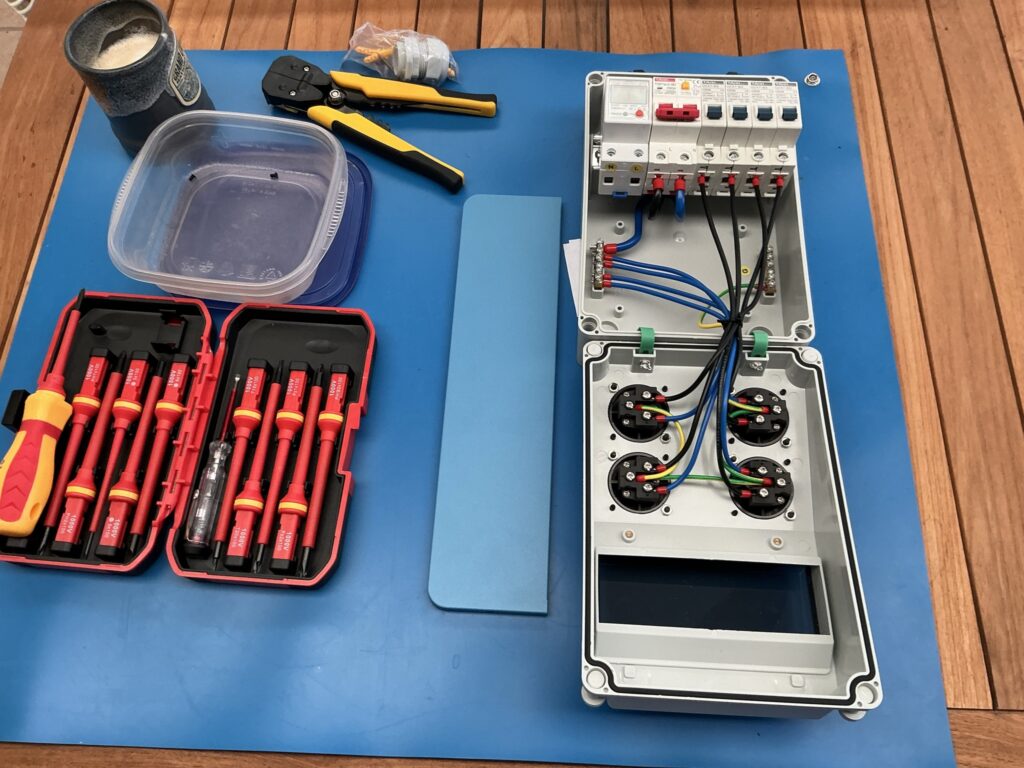
Tools
- Small Phillips head
- Remove solark connector enclosure plate
- Medium Philips head, insulated
- connect terminals inside chargeverter
- For the small and medium screwdrivers we used an insulated set
If you are working with electricity you need to have this:
100V 13Pcs Insulated Screwdriver Set $22 at Amazon
- Small box wrench or adjustable wrench
- attach brackets for solar to hand truck
Stanley 6″ Adjustable $6 at Home Depot
- attach brackets for solar to hand truck
- Wire stripper with crimp
- Strip and crimp solar extension cable ends
- Stripe AC patch cable for outlet box to chargeverter
- $60 at Amazon
- Optional : Solar Crimper Tool Kit
- If you are working with Solar you will eventually be adding your own MC4 connections.
We recommend the BougeRV Crimp Tool Kit $28 at Amazon
- If you are working with Solar you will eventually be adding your own MC4 connections.
Putting It All Together
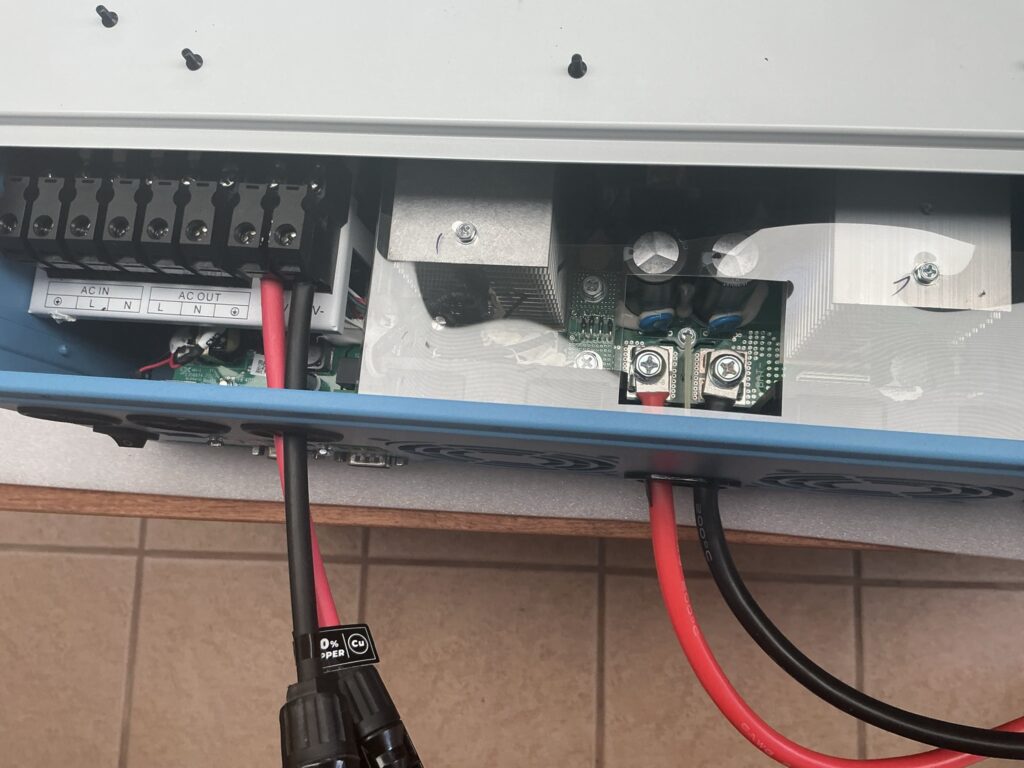
First step was wiring the battery to the chargeverter. The battery comes with battery cables that are ring terminated. They work perfectly with the Sunpower chargeverter. Before making any connections, ensure the battery and chargeverter breakers are off. The insulated screwdriver set is magnetic, allowing the lugs for the chargeverter to be carefully lowered into place. Internal components in the chargeverter, especially larger capacitors, can hold a charge even when powered off. Better to be safe than sorry and use the insulated screwdriver set.
I connected the battery to the chargeverter to test they were both working. I also use this opportunity to set the chargerverter to a battery type of Lithium Ion (LFP). This is important as it changes the voltage settings for the battery. Gel, Lead Acid, and other battery types all have slightly different parameters for how many volts to push when the battery is empty, full, etc. Set this to LFP battery type to ensure a longer battery life. The battery does have a battery management system (BMS) on board, but it will be a lot happier if the chargerverter is not making it work too hard. Once the battery was setup and the chargeverter functionality was confirmed I powered everything down and disconnected the battery.
Note: During this build we learned that which battery post you connect to matters. On our battery pack we initially had connected to the “inside pair” of terminals on the pack; The right terminal of the positive (red) block and to the left terminal of the negative (black) block – the two closest to each other. Apparently this matters. We moved the black terminal to the right side post and tried again, everything powered up as expected.
Solar Input Wiring
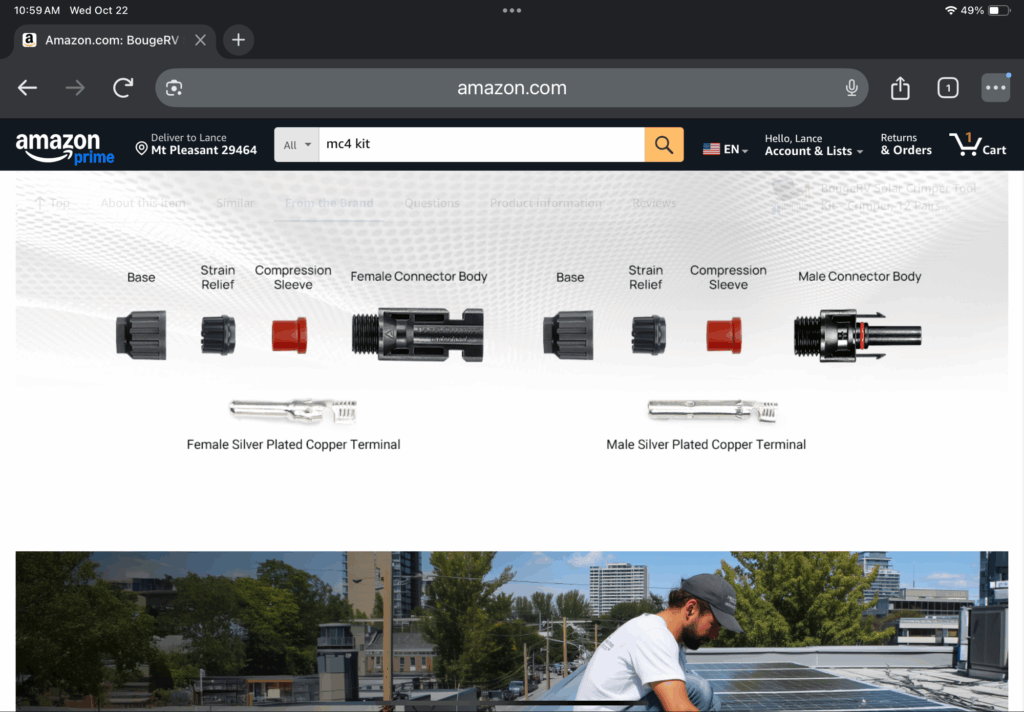
Next was installing the solar input MC4 connectors. MC4 is an industry standard connector that makes it much safer to connect and disconnect high voltage DC like a solar string. The cables we used were from a prior project and already close to the right length. I trimmed and re-stripped the ends for a clean connection in the U-clamp screw down posts that are in the chargeverter. The chargeverter is designed to accept stripped bare wire other than for the battery connection. The parts list includes cable for this, the 6′ 10AWG solar extension cable. It will be far too long for this use case, so you’ll want to cut it to the about a foot in length and strip the end to install this into the chargeverter. Remember, red should be positive and black for negative in a typical DC solar setup.
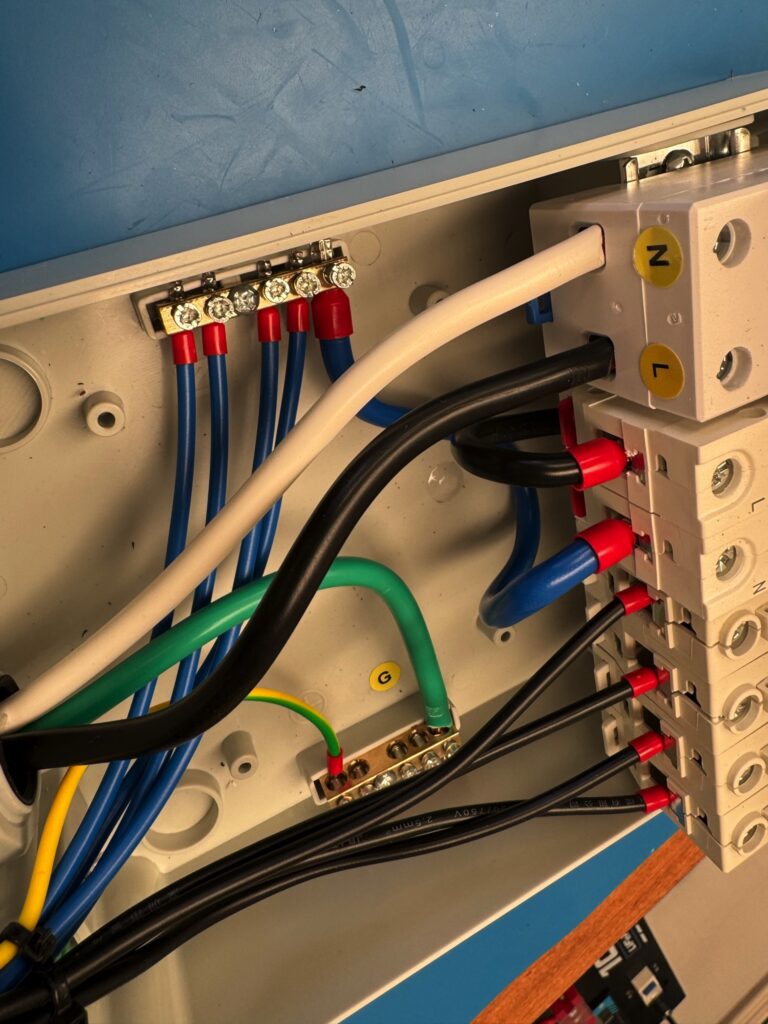
AC Input Wiring
Normally I’d have wired the AC Input plug at this time as well. The item on the parts list is already stripped, so that part was easy. Insert the wires into the AC In on the chargeverter and tighten. Live (L) is the black wire. Neutral (N) is the white wire. Ground (G or a grounding symbol) is the bare copper wire or the green wire (in our part list both AC cables have a green grounding wire). Since Amazon, in typical fashion, shipped this part a week later than promised, I put the unit together without the AC input and added this after the rest of the system was built and running on nothing but sunshine.
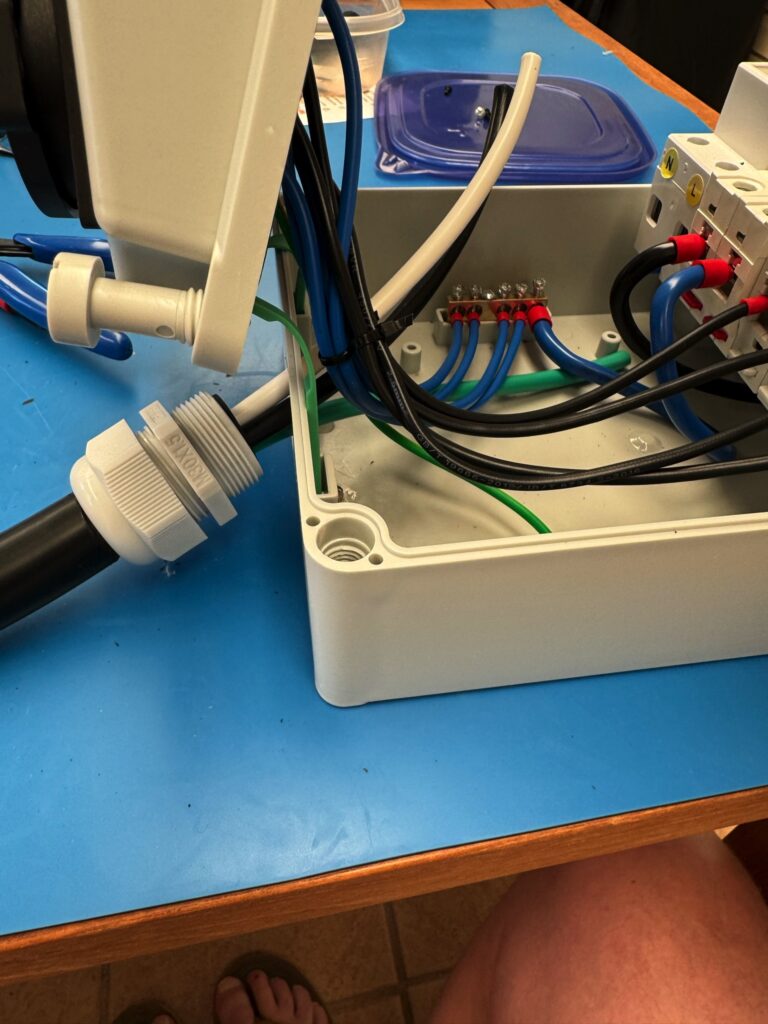
Wire The AC Outlet Box – Do Not Connect To Chargeverter
Wire the outlet box with the AC patch cord. I went with an 8AWG as it can carry more current, but it was a bit too large and required far too much “hackery” to get it to fit in the chargeverter and the outlet box cable gland. If I were to do this again I would go with a slightly smaller 10AWG cable. With some manipulation I was able to route the cable, strip the heavy outside jacket (very carefully with a cable cutter and razor knife), and strip each wire to length to fit inside the U clamps and screw down bar for the ground. The AC outlet box was wired and ready with the stripped (and trimmed) end opposite the outlet box ready to be wired into the chargeverter.
The last wiring part is the AC outlets, but I do not recommend doing that at this stage. Instead, mount the battery and the chargeverter to the hand truck. It will be easier to route the AC output cable and mount it to the back of the chargeverter. If you attach the ac outlet box first, it will be much harder to manipulate that and the chargeverter into place on the hand truck.
Mount The Battery and Chargeverter
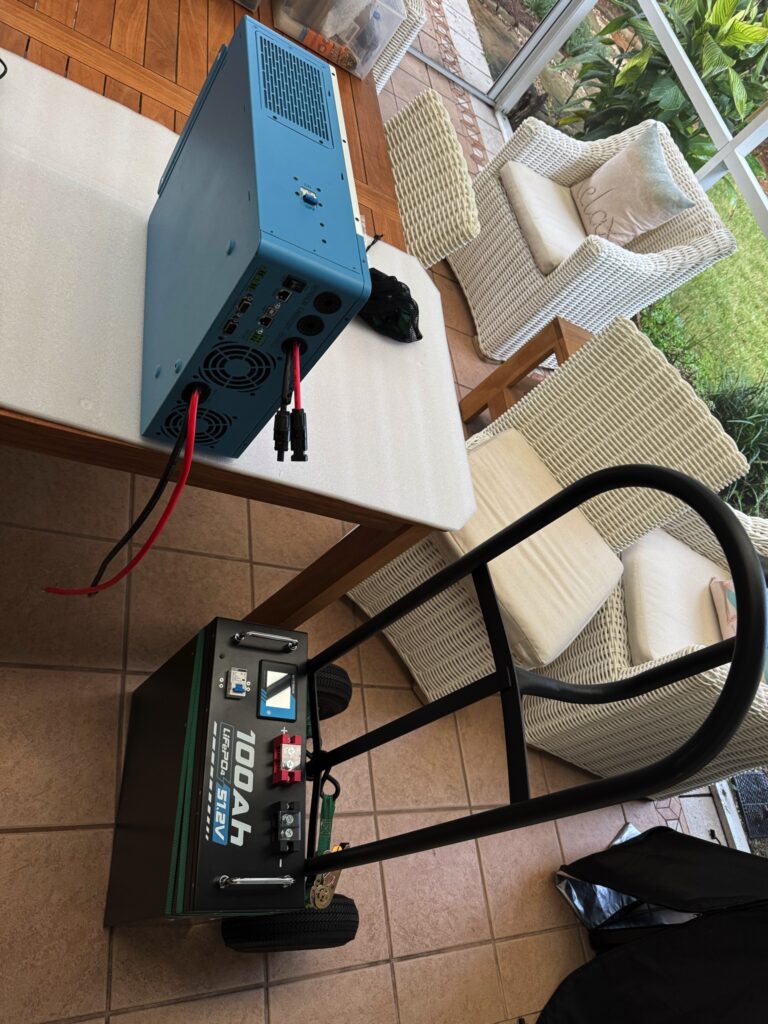
Mounting the battery was the easiest step. Place it on the hand truck, secure it with a ratchet strap to the hand truck rails. Easy peasy. Install time, about 3 minutes, 4 if you take your time. Easy peasy.
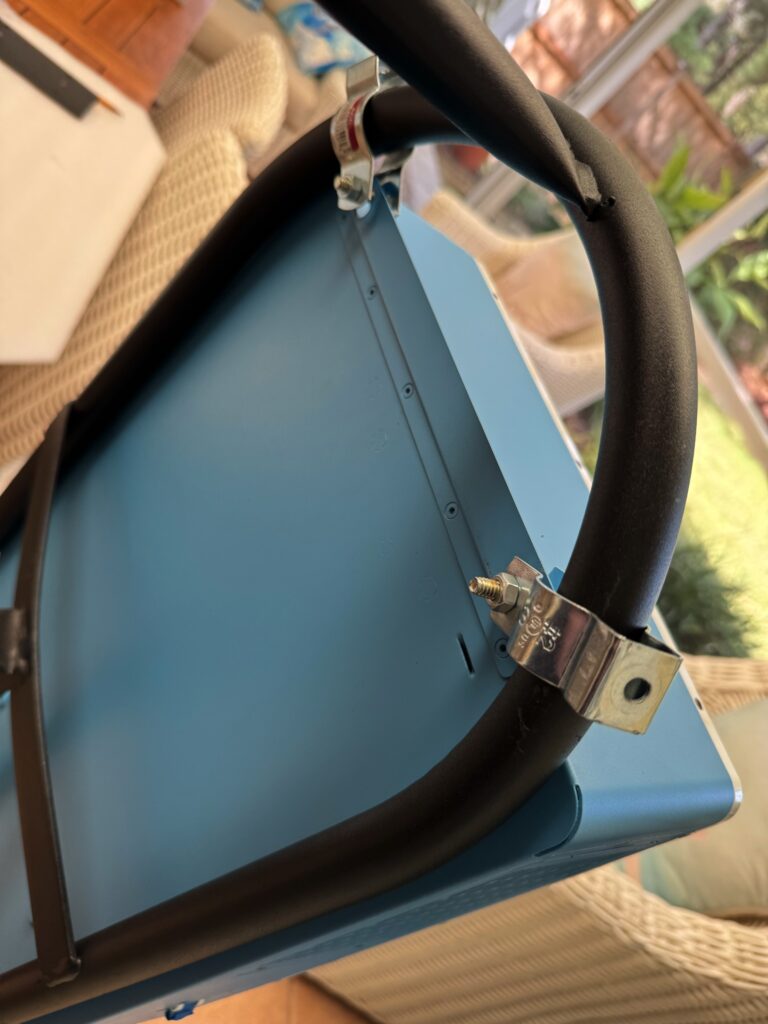
Next, mount the chargeverter to the hand truck. For this step lay the hand truck down on the ground and lay the Sunpower chargerverter on the rails near the very top of the hand truck. The great thing about this Milwaukee hand truck and the chargerverter is the chargerverter fits perfectly on the rails, within an inch or less the same width. It lies flat nicely on the hand truck without sticking out. That makes it easy to attach the ACC conduit brackets. I found this to be a great hack versus drilling through the hand truck rails and using mounting bolts. The ACC bracket comes with a bolt that fits perfectly in the chargerverter mounting bracket. The #2 size ACC conduit hanger also happens to fit perfectly around the hand truck frame. Put those on each side of the top of the hand truck rail, and position them to line up with the holes in the chargeverter. Insert the included bolt and tighten.
Reconnect the battery and ensure everything is tight. All power connections should be snug. Do not over tighten, but definitely check each cable does not easily move.
Connect The AC Outlet Box and Solar Breaker
Now it is time to connect the AC box. My technique was to stand up the hand truck and insert the outlet box behind the D-Ring handle on the back of the hand truck. I ran the cable that connects the AC outlet box between the back of the chargeverter and the cross-brace on the hand truck. Between this cable and the D-Ring the outlet box stays mostly in place. I did add velcro to the back of the outlet box and chargeverter to keep it in place but allow me to remove it for repairs or upgrades.
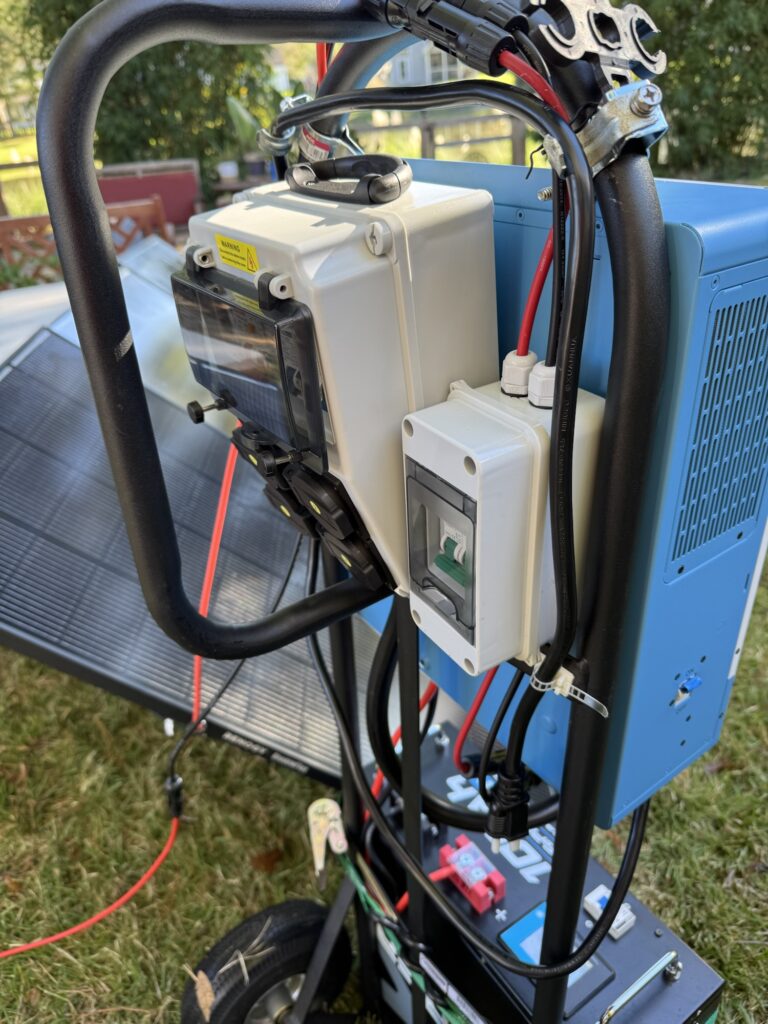
Next up – lie the hand truck down again and insert the cable from the AC outlet box into the chargeverter. Connect that to AC Output, black is live (L), white is neutral (N), and green is ground. Tighten everything using the insulated screwdriver. Check all other connections. Replace the faceplate on the chargeverter. Stand it up. We are ready for solar.
Solar Wiring
For the solar I used a 32A solar disconnect. Our Renogy 200W Shadowflux panels do not put out anywhere near that when wired in series. The disconnect is easy enough to wire. Connect the already-provided MC4 connectors to the matching pair on the Chargeverter. I ran the cables between the chargeverter and the hand truck cross brace to keep it in place.
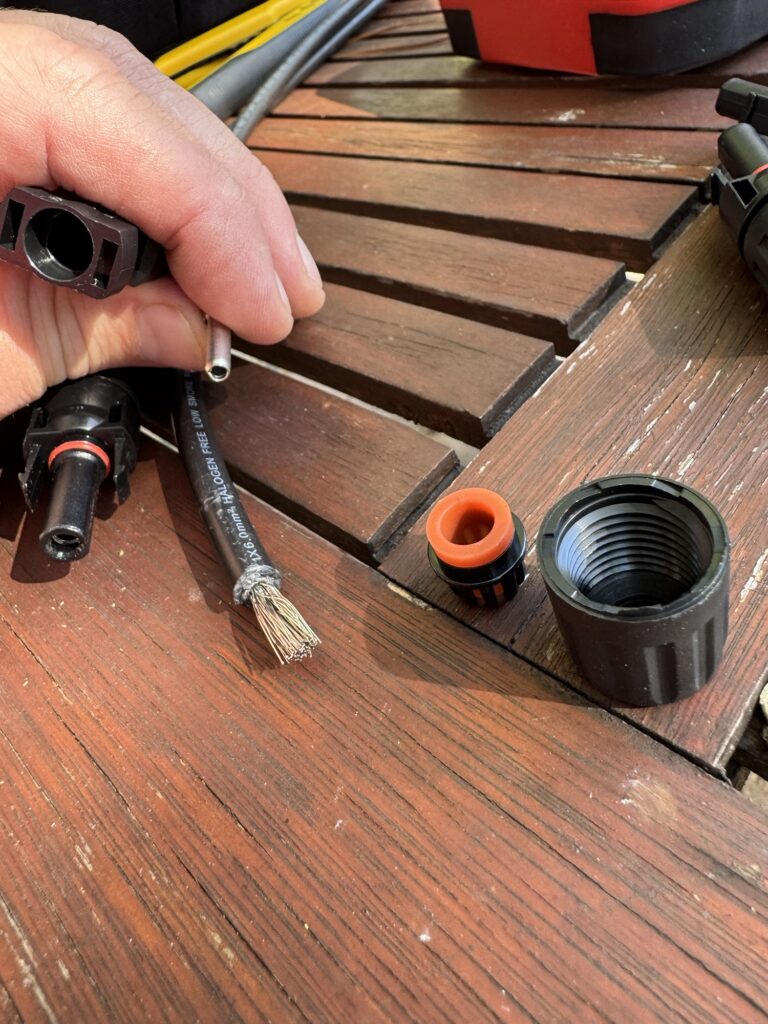
If you purchased the parts on the part list, the solar extension cables will have one unterminated end. That makes it easier to trim these to length. Power, especially DC power , prefers shorter cables. Longer cables create more resistance. Too long and the wire heats up. Too hot and poof… solar powered fire. You can avoid that with thicker (lower AWG numbers) cable. Or push more voltage (but no more than 500Vdc on these cables). The cables we listed here are well within safety limits for the amount of power and voltage we are dealing with at this length and gauge. You can crimp the MC4 connector ends onto these cables as-is if you don’t feel like trimming them shorter. Remember to place the cable end grommets on the cable first, then strip the wire, and add the metal connector. Pay attention to the MC4 connection guide as the pin (metal part) and housing (outside plastic part) can be confusing. I’ve had to cut off the ends of more than a couple of MC4 connectors over the past 2 years and start over. Look at the already-finished end on the cables we listed and put the OPPOSITE gender on the other end. One will have a larger opening and the other a smaller one. Make sure you keep the right pin with the right housing. I recommend doing one at a time so you don’t confuse the parts-pieces. If step, you are concerned with this step you can opt for the pre-terminated MC4 solar extension cables.
Solar Panel Connection
We are now ready to connect our solar. I setup 4 panels originally (later 6 panels) by just leaning them against some yard benches and tables. They need to be wired in series to boost the voltage. The chargeverter needs at least 120 volts to get the MPPT (solar charger controller) online. The Renogy panels are 31.3 volts Vmp , so 4 of them in full sun will do the trick. To wire panels in series connect the negative wire from one panel to the positive on the one next to it. The first panel in the line up will have a positive line with nothing attached. The last panel will have a loose negative cable. Once connected they can stay connected (until you need to move them, like I did). To make the cables reach the hand truck, connect the back solar extension cable to the negative on the last panel and the red cable to the positive.
Wheel over the hand truck. Make sure all breakers are off – chargeverter, battery, solar breaker, ac outlet box master breaker. Connect the solar array to the solar breaker box on the hand truck. The cables will only fit one way. Hopefully you followed proper wiring ensuring positive is red, negative is black, and you put the proper terminators on those MC4 extension cables.
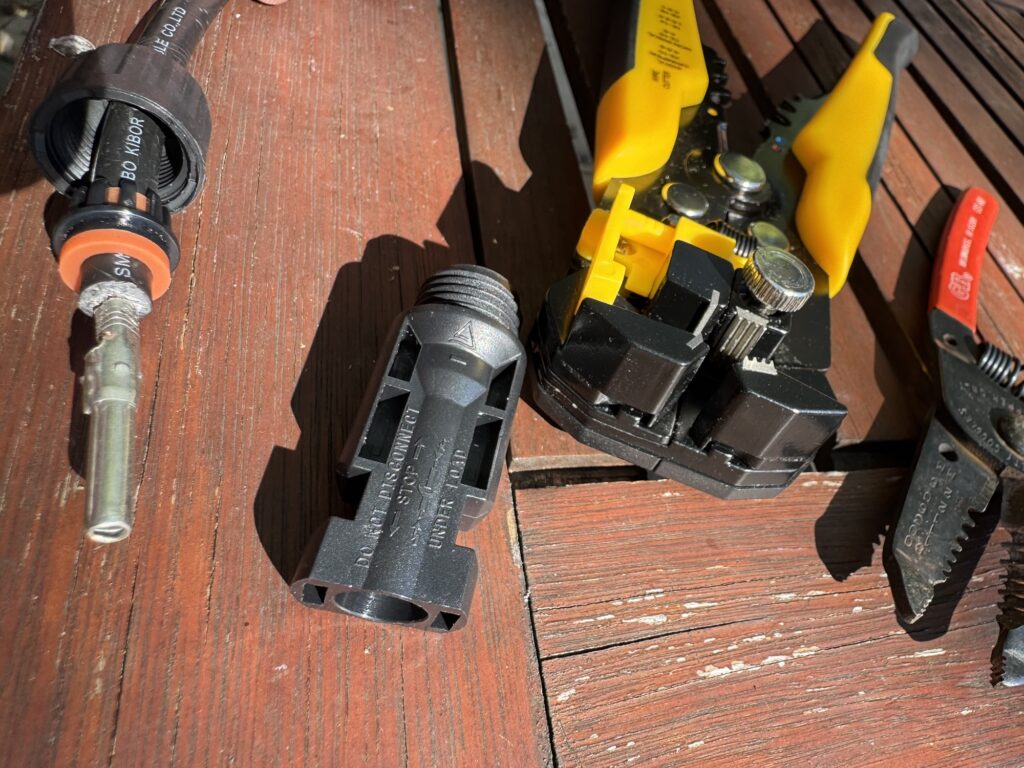
Keep in mind that once you connect the MC4 connectors they are not easy to take apart. They are not meant to be connected and disconnected on a regular basis. If you need to disconnect them, which is almost guaranteed with an indoor battery connected to solar panels that are outdoors, you’ll need that MC4 connector tool. There are tabs on the side of the MC4 connectors that need to be pushed in while pulling the connectors apart. You can try using pliers but it will not be easy. Do yourself a favor and buy the $10 MC4 tool. Also, they are not all created equal; despite MC4 being a standard both connector makers and tool makers seem to think it is ok to be a millimeter or two off — so not all tools work with all connectors. Buy a quality brand of tool and connector. We like BougeRV as they seem to follow the Staubli (MC4 OEM) standard fairly closely. Also — if anyone knows of a better system than MC4 for solar connections that may need to be disconnected and reconnected on a regular basis , please share. Some SAE connectors look promising but we’ve yet to find the right option.
Power On
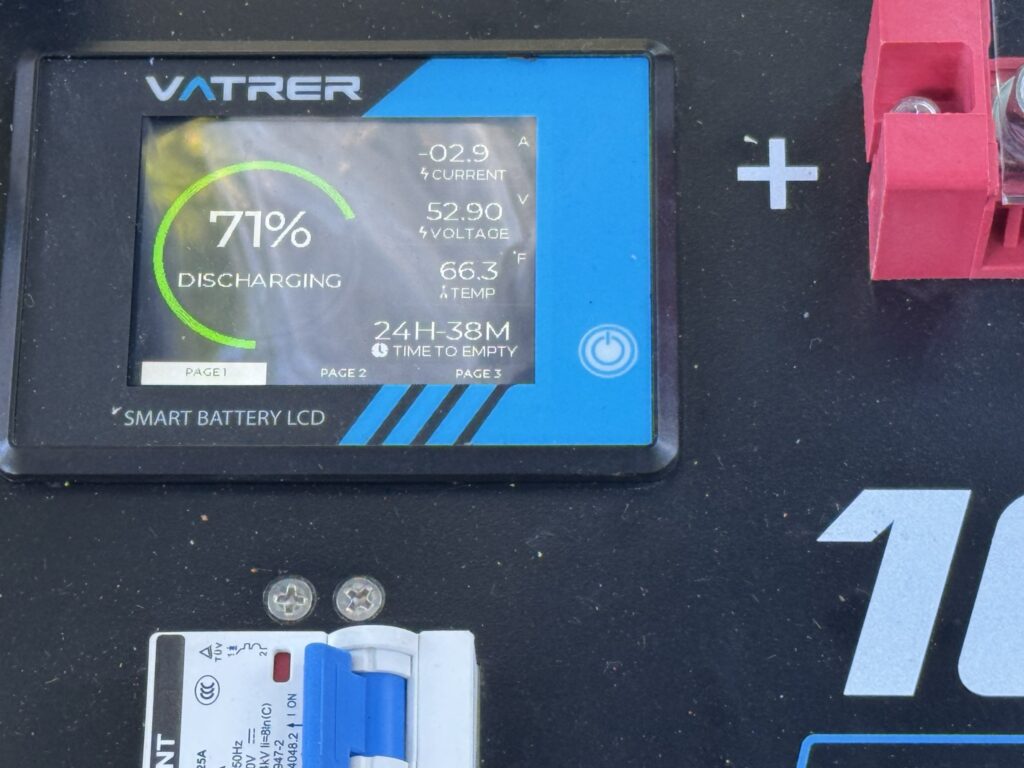
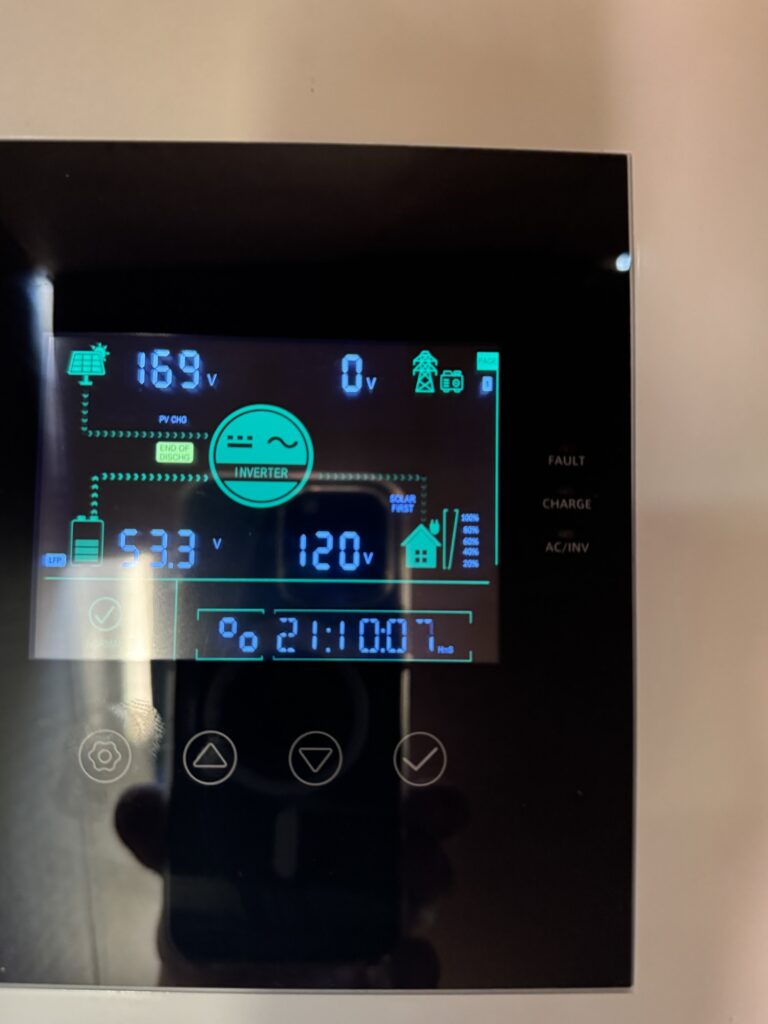
Time to test things out. Turn on the main breaker for the battery. Press the soft power switch. Turn on the breaker on the side of the chargeverter. Turn on the chargeverter with the power button (on the bottom near the cable inputs on the AC side). The chargeverter should power on, assuming the battery had some charge (ours shipped with 50% charge). Give the chargeverter a minute to self-check and power up fully. Then flip on the breaker for the solar disconnect. If there is enough sun hitting all the panels you may hear a beep shortly after turning on the solar breaker and the yellow charging light on the chargeverter should illuminate. The top-right of the chargeverter LCD will show solar volts in. Now to test output, I connected a 100W fish pond pump to one of the AC outlets. Flipped on the main and sub breakers. The pond started pumping. The little LCD display in the AC outlet box was showing a power draw (I changed the mode to show watts being consumed).
Sweet, everything seems to be working. In full sun the 4 panels barely keep up, but I would often see the display on the battery showing charging even with the fish pond pump running. Later in the week I added two more panels to the array, boosting voltage. That ensures the system will start charging the batteries and/or supplying direct power to my AC loads earlier in the day and later into the evening, especially shadows from the trees and home start to cover each panel one-by-one. Six panels gives me a lot more space to catch sun rays and also means that even in low light the 6 x 31 volt panels will more easily get to the 120 volt minimum needed to power the charge controller up.
Wrap Up
Now that this has been running for a few days and I can see it easily powering fish pond pumps and our patio mini fridge it is time to create a permanent home. This is an INDOOR ONLY unit. The battery bank and chargeverter are not rated for outdoor use. That means wheeling the cart in and out and only on sunny days. I will be putting this in a waterproof shed and running the solar to it there. It will be used to power the yard tool batteries and some outdoor lighting while I work on the AC runs to plug in our other outdoor living space items (like that mini fridge and pond pump). At this location this portable generator will be mostly stationary in our outdoor living space. However, when the power goes out in the house I can easily wheel this into the house and plugin in whatever we need – the home fridge, the network router, and the Playstation mainly.
Eventually I will be making some upgrades to this system and at some point will likely build an outdoor-ready version. Or maybe I can find or craft a weatherproof cover for this thing that doesn’t overheat the chargeverter.
This is our first build of someone else’s project. We made a couple tweaks of our own to what Will Prowse originally built, but it is mostly the same build kit he created. If you can think of any improvements please share with us or post on the DIYSolarForum where we hope to note this article later this month.